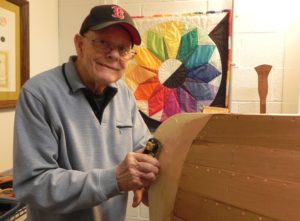
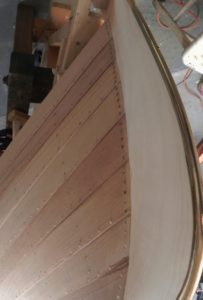
When you are finally getting to making the decks you know you are nearly done. There is a clever display at the Adirondack Museum that speaks to the decks. It is next to the boat shop where Allison creates her marvelous guideboat renditions. It is a full size guideboat that is cutaway to show its different parts. A narration goes along with it. Every time a visitor pushes a button the boat rotates and the narration begins. I have heard it hundreds of times. One part stresses the importance of the guideboat’s decks to the builder. The narrations goes something like this ” Guideboats are remarkably similar in design. Guideboat builders used the decks to display their individuality”.
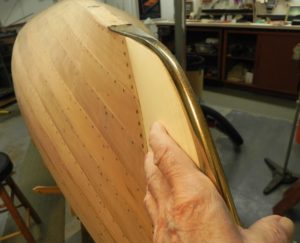
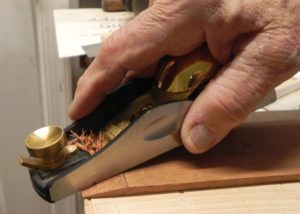
The decks were used to hide the hand holds for lifting and carrying the craft. Decks consist of three parts, the deck bridge, the deck itself, and the deck cap. Here is the deck bridge.
The deck bridge.
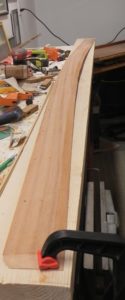
The bridge consists of the carlin, the curved piece, and a straight member. They are made of ash.
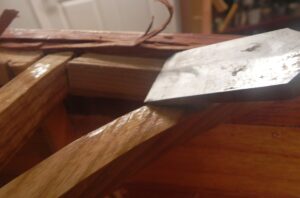
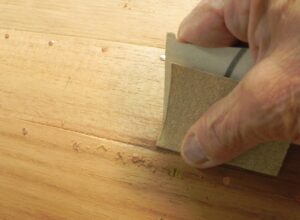
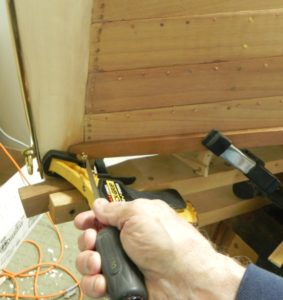
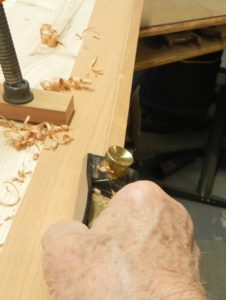
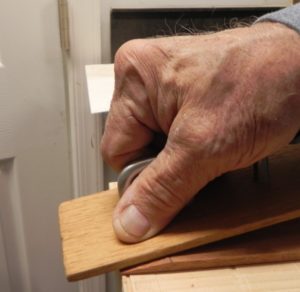
In order for the deck to fit flush with the gunwale I have to cut away some of the planking to make a rabbet.
Using a chisel to cut away the planking to form a rabbet for the deck to fit into.
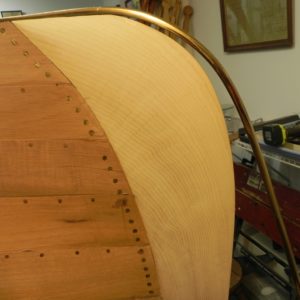
Builder Caleb Chase employed an uncommon twist to the decks he built. They have a crown made by making the bridge higher in the center than on the edges. The crown is only about 1/2″ higher than the edges but, in my opinion, it has a dramatic effect on the appearance of the boat. It is a subtlety but conveys a sense of “motion” to a stationary boat.
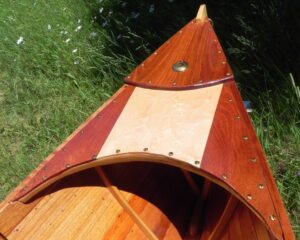
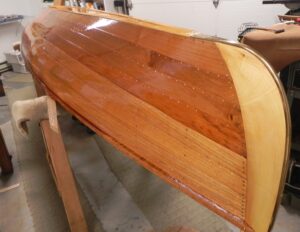
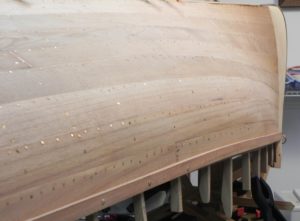
I made my decks of a central panel of bird’s eye maple flanked by pieces of Spanish cedar. Jumping ahead, here is the finished bow deck.
Finished deck.
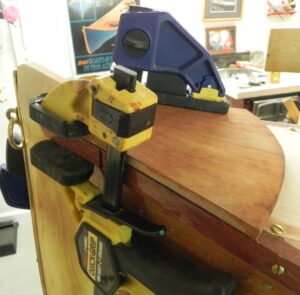
The crown doesn’t cause any consternation with assembling the deck but it sure does with the deck cap. That is because the deck is only about an 1/8″ thick while the cap is 3/8″ thick. I struggled with how to get the caps to conform to the crown. My wife happened by while I was stymied and said why don’t you use your old trick, water? So I did. I took a water soaked rag and draped it over the cap.
Cap being soaked to make it conform to the deck.
After a few hours of soaking the cap conformed nicely. But as soon as it dries out it will go right back to its original shape. To prevent that from happening I clamp it down.
Deck cap clamped down after soaking.
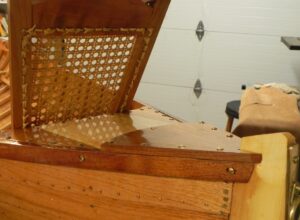
Here the cap has dried after being clamped. It fits quite nicely.
Deck cap ready for fastening.
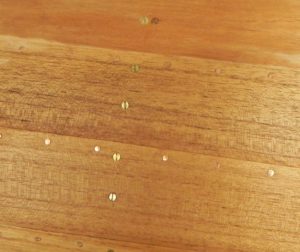
The decks are fastened with #8 oval head brass screws. The oval heads give it a classy look.
Here is the stern deck after varnishing.
The finished stern deck.
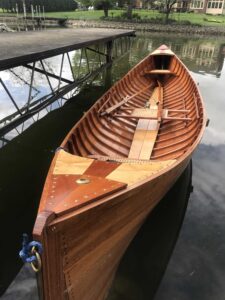
Note the feed thru on the bow deck in the photo above. It was originally used to hold a candle lantern when “floating” for deer in times gone by.
Next time we head north to Long Lake for a photo op and launching.
It never occurred to me until now. A nascent guideboat does not start to exist until she comes off the builder’s jig. So today will be the day she is born.
So, what about launch day? What would you call that? I would liken that to a debutante at her coming out party.
Let’s have another look at her on the builder’s jig.
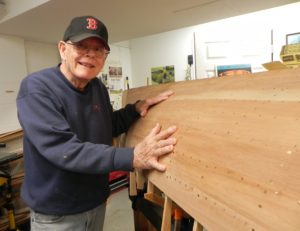
My boat just before she comes off the builder’s jig. Notice that the Spanish cedar has become strikingly beautiful upon varnishing.
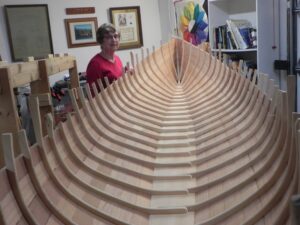
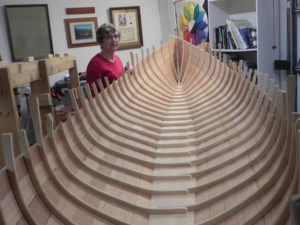
The reason that releasing the hull from the jig is so important to me is that I have never seen the inside of the hull. I have been fretting over this moment. How have I done on the inside? Will I be disappointed?Well here is my wife Fran standing next to her after pulling her off the jig.
My first view of the interior of my latest guideboat.
A cursory inspection reveals that all is well. Not a bad job at all.
At the Adirondack Museum, Carl Hathaway narrates a video of Willard Hanmer building a guideboat. Having been a docent in the boat shop while Allison builds guideboats for many years, I have heard Carl’s narration a hundred times if not more. When Willard takes his boat off the jig, Carl intones”the boat is about half done”. Really, I think. I have spent what seems to be an eternity in getting this far only to learn I am only half done. But, you know, I think he is right.
So let’s get after it. The first thing is to cut of the rib ends that are so conspicuous. I use a Japanese flush cut saw for that duty.
Cutting off the rib ends with a flush cut saw.
The next task is to clean up the planking to rid it off bedding compound and to make sure the planking feather edge is finished off. I use a cabinet scraper with a curved profile to do that. There is also work to be done along the shear line. The shear plank does not always line up with the gunwale. In fact, I purposely left the planking just even or slightly above the gunwale.
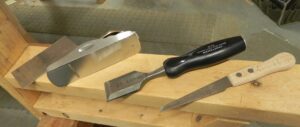
Here are the tools to render the planking flush with the gunwale.
Tools for rendering the shear plank flush with the gunwale; flush cut saw, chisel, block plane, and cabinet scraper.
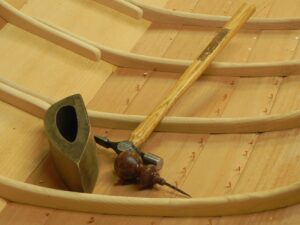
Now there are about 2500 brass screws in a guideboat and 4000 copper tacks. It is time now to add more tacks. We need to drive tacks from inside the hull and clinch them to help seal the feather edge joinery of the planking. Here are the tools for doing that.
Tools for driving tacks from the interior of the hull.
The awl is used to set a pilot hole for each tack. The tacks must be “stuck” in each hole. This is a tedious task and one not meant for someone with large fingers like mine.
When I was a docent in the boat shop at the Adirondack Museum I used to tell this story to the kids who cane to watch Allison build a guideboat. I would say “Suppose you lived in the Adirondacks in the 1870’s and your father was a guideboat builder. He would pay you to stick tacks in the holes he had punched for them with his awl. He would pay you a nickel for each round of planking. Now, there are eight rounds of planking so how much would you make?”
I got help sticking tacks when building my second guideboat from my granddaughter Haley. Her photo sticking tacks is on the title page of my book Tale of an Historic Guideboat and How to Build One.
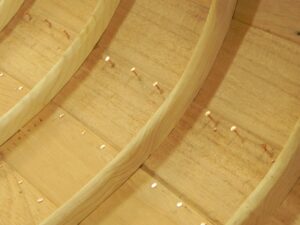
Here is a line of stuck tacks.
A line of stuck tacks.
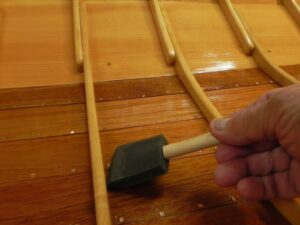
Finally it is time for varnishing the inside of the hull. This is where Epifanes Woodfinish Gloss marine spar varnish saves tons of work. If you apply subsequent coats of this varnish within 72 hours you need not sand between coats. You can image sanding each space between ribs (or bay). That is a awful lot of tedious work that this varnish eliminates. Here I’m applying varnish with a foam brush.
Varnishing bays with a foam brush.
Next time we turn our attention to the decks. They are a signature that each builder can incorporate in his boat.
It is almost time for the hull to come off of the builder’s jig. I can’t wait to see what the inside of the hull looks like. It is almost like seeing a newborn baby for the first time.
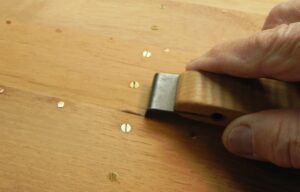
Before that event, there is some work to do. The hull needs to be “preened” as I call it. The bedding compound does not always stay were it belongs. It extrudes out of the seams sometimes and must be removed before varnishing. I have found that a clever scraper designed by my friend John Homer comes in handy, Here it is:
John’s scraper
Note that there is some bedding compound just to the left of the scraper blade.
Another way of removing excess bedding compound is to use sandpaper like I am doing below.
Using sandpaper to “preen” the hull.
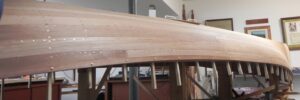
So here we are about to apply the first coat of varnish.
Hull ready for varnishing.
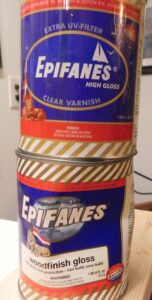
The varnishes I like to use are made by Epifanes, an import from Holland. They supply two excellent marine spar varnishes. I order them from Jamestown Distributors in Rhode Island. Here they are:
Epifanes varnishes.
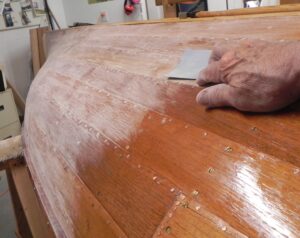
I normally use Epifanes woodfinish gloss. It is extremely durable, goes on easily and is not prone to runs. Its main attribute is that there is no need to sand between coats to get adhesion of subsequent coats. However, this time I slipped up and bought their clear varnish instead. I found it had the same outstanding qualities but needed to be sanded between coats. Here we are sanding between coats.
Sanding the hull between coats of varnish.
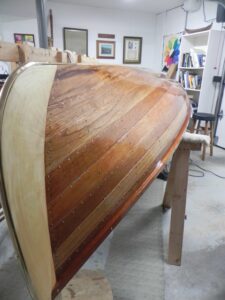
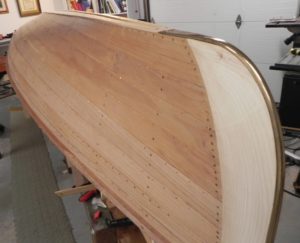
So, after four coats of varnish the exterior hull is finished.
Hull exterior after four coats of varnish.
Next time, the great unveiling; we see the interior of the hull for the first time. It is sort of like a birthing.
This week I got an email with photos from my friend Jon. Jon bought my third guideboat, the Thankful, three years ago. Thankful was named after Caleb Chase’s wife, whose maiden name was Thankful Preston. I thought it was an unusual name, but an appropriate one. Caleb was the builder of the Queen Anne, the guideboat I have reproduced now four times. It is a classic design. You can read all about the Queen Anne in my book Tale of an Historic Guideboat and How to Build One.
When I advertised that I had a guideboat for sale, I had no idea who would be interested. I couldn’t have asked for a better suitor for Thankful. It was apparent from the very start of our conversation that Jon understood the effort that had gone into the creation of Thankful. He promised to take careful attention to her. One reason he wanted Thankful was so that his children would experience the Adirondacks as he had growing up.
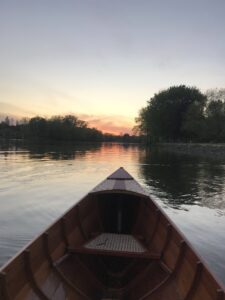
Here is the message that he sent with photos of Thankful. “Here are a few pictures of her on the water and in use over Memorial Day weekend this year. We live on a channel off the main Seneca river, along the path Hiawatha would have used to get from Onondaga to Cross Lake, the reputed site of his original village.
She never fails to turn heads and my daughters love the way she rides the waves of passing motor craft. I love the way she pulls and the quiet way she holds a line.
I’ve made no modifications or changes to the way she was built but am having a yoke carved now so that I may be able to traverse the Adk carries . I’m looking forward to entering her in the 90 miler and am hopeful that this year will be her year.”
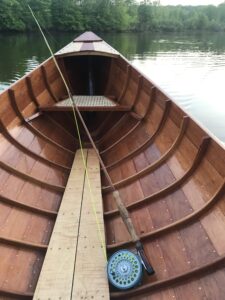
Thankful at rest.Fly fisherman.End of a beautiful day.Future 90 Miler.
Jon and his family also have a home on Fourth Lake in the Adirondacks so Thankful gets plenty of exercise.
Jon, thanks for telling me all about how my offspring is behaving. I couldn’t have found a better suitor for her.
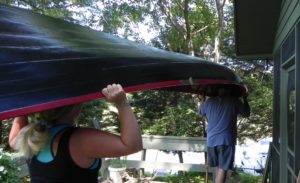
When it came time to take my latest guideboat off the builder’s gig I was full of apprehension. It meant lifting the boat up a ways and flipping it over so it is right side up. I wasn’t sure how far we would have to lift the boat to clear the jig. My old workshop had plenty of headroom but this latest was a converted garage in the basement. There is not a lot of clearance in the new shop. Here she is still on the builder’s jig.
Latest guideboat still on the builder’s jig.
Anyway, I set up padded saw horses next to the boat and asked my wife Fran if she would take one end of the boat, and I the other, and we would give lifting it off a try ( I didn’t know what we would do if we got stuck with it halfway off.)
I think I told her that it would be all right if we let it rest sideways on the gunwale while getting it off the jig. In our favor the boat does not weigh very much at this stage, at the most 60 pounds. So off we go! Now Fran is a strong woman but on the short side. The boat slid upwards easily but the problem arose in turning it over. I heard an anguished shriek from the other end. Fran yelled “My heads caught inside the boat!” What to do? I can’t leave my end. I said “Drop it down on the gunwale, it can take it”. She did, and the crisis ended.
There was suspense on my part about seeing the inside of the boat for the first time. Some of the old time builders had a rotisserie-type builder’s gig that allowed them to spin the nascent hull around to view both sides while they were in the midst of planking. I had no such luxury.
My first view of my baby guideboat was breathtaking. She was beautiful! She brought a tear to my eye. Here she is with Fran next to her.
Fran with the latest arrival.
Before we took baby guideboat off the jig I gave her two coats of Epiphanes wood finish gloss marine spar varnish on the outside of the hull. That brought out the amazing beauty of the Spanish cedar she is made of. I’ll talk about that in another post.
So it occurred to me that a guideboat has two important days in its life. The first is when it is “born”. For me that is when it comes off the builder’s jig. It is the first time anyone has seen the inside of the hull. Of course you can scrunch down and look under the upside down hull or use a mirror to take a peek. But that is not the same as seeing her right side up for the first time. Again, breathtaking! All the worries about “What kind of job did I do under there” dissipate.
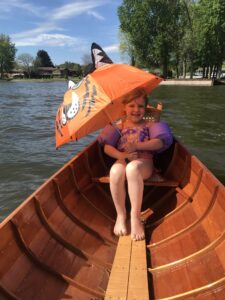
The second important day is launch day. That is the day she first encounters her reason for being, to float with her friend/friends aboard. She is now clothed for the occasion, with guideboat furniture installed, oars and oar locks in play, and fancy decks that hide the handles for lifting her over Adirondack carries.
By the way, I weighed her using a bathroom scale. She came in at 60 lbs. That is quite good considering that she already has two coats of varnish on the outside of the hull.
There is film of Willard Hanmer building a guideboat that plays over and over again in the boat shop wing of the Adirondack museum. When he takes his boat off the builder’s jig, the narrator, Carl Hathaway, proclaims that Willard is “just about half done”. I hope I am further along than that but there is still much work to be done.
Next time we step back and see how the hull was varnished.
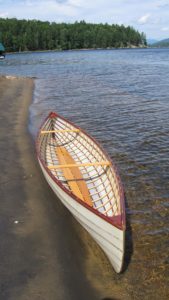
“A fifteen foot ship that weighs only sixty pounds and carries a thousand pounds of load over rough water; which is safe, which travels easily faster than four miles an hour ; which never leaks; and which lasts, with ordinary care, for twenty years-needs to be made by a man (or woman) who is passionately fond of being being honest.
William Boardman Lovers of the Woods, 1901
What is it about a guideboat that gives it such extraordinary performance? It combines great carrying capacity and speed in a very light package.
The innovators who devised the guideboat took their inspiration from the Old World wherry. This Old World rowboat has a flat bottom and ribs taken from tree roots. It has a squared off stern, or transom. Originally guideboats had the same squared-off stern. It is said that Caleb Chase of Newcomb, NY changed guideboat construction to a double-ender in 1870.
A structural engineer would analyse a guideboat as follows: the bottom board provides a platform to fasten the ribs and stems. The planking, of course, provides the “hole in the water” to make it a floating vessel. It also gives this “structure” stiffness. Now add to that the gunwales, strips of hardwood running along the top, or sheer, of the hull. These tie each member of the craft together to give its remarkable properties; strength, durability, speed and load carrying capacity.
I had one heck of time installing the gunwales on my first boats. Made of flat-sawn cherry, they just did not want to bend to follow the shear line of the hull. So I had to steam them using a cobbled up arrangement of a cleaner’s bag “tent” and steam from a kettle. I used a home made winch to gradually draw the gunwale down into place. It was really hard work!
Then someone told me to use quarter-sawn cherry. What a world of difference! It is easily bent to where you want it. This phote show how far the gunwale has to be bent to follow the shear line,
Gunwale before fastening it down.
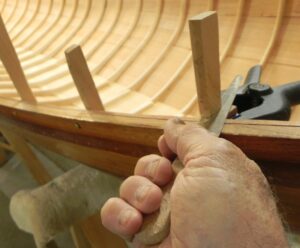
The really tricky part of the gunwale installation is getting the angle where it meets the stem just right. The gunwale meets the stem at a “rolling curve”. That means we are not dealing with a right angle here. So it is a matter of judgement and backing and forthing to get an intersection that is OK. This photo shows the gunwale being fastened down at its intersection with the stem.
Securing gunwale at the stem.
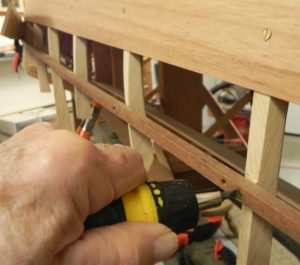
I use No. 8 X 1 1/4″ oval head screws to fasten the gunwale at each rib station.
Attaching the gunwale.Here I am drilling a hole for the fastener.
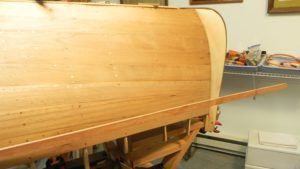
When I look down the hull with the gunwale installed I am reminded of what shipwrights call a “fair curve”. It is something in a boat builder’s head that is hard to convey to others. It is basically a harmonious, sensory pleasing curve that just “looks and feels” right. Here it is, a look down the hull with the gunwale installed.
A far curve as defined by the gunwale.
Next time this pretty little miss gets her first coats of varnish.
My boat has moved along so that it will soon really look like a guideboat. I’ll explain as I go.
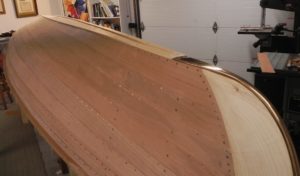
A guideboat needs certain attachments to provide for its protection. One is a stem band, a brass band that wraps around each stem. It is meant to take the force of a blow (such as running into a dock) that would cause grievous damage to the stem.
Before I can attach the stem band I need to shape the stem into a nice aerodynamic shape. It was left squared off until now so that I could ensure the stems were plumb and square to the rest of the hull. To shape the stem, I used my low angle block plane. It was the only tool that would fit into the space occupied by the stem.
Planing the stem.
Now the stem band can be installed. I fasten it at the base of the stem and bend it using the stem as a mandrel.
Bending stem band to fit curvature of stem.Bending stem band-another look.
This stem band, fasteners, oar locks and other items were given to me by Diane Shelly, a neighbor in Long Lake. Her husband, Darwin, was a surgeon who looked forward to building his own guideboat once he retired. He prepared for that adventure by purchasing enough of the materials to build two boats. Unfortunately he succumbed to cancer before he could realize that dream. I often feel his spirit while building this boat.
The band is made of annealed brass and is easily bent around the stem. The trick is not to drill holes for screws for securing it along its length until after it is bent. Otherwise the holes would present a weak spot and the band would not bend uniformly.
A nice touch is to add a painter ring to each stem. A painter is the line that allows one to tie up your boat to a pier. I got these rings shopping on Ebay. They are originals from Old Town Canoe.
Painter ring.
Now to the shoes. Guideboat shoes are thin strips of wood that lay over top of the bottom board to protect it when the boat is hauled ashore. I used strips of pine 1/8″ thick by 3/4″ wide. I ran a bead of Sikiflex bedding compound along the garboard plank/bottom board interface just to ensure that there would be no leaks there.
Sikiflex bedding compound.
Here is long look at the shoes.
Long look at the shoes.
Shoes and stem band view.
Note that the stem band flairs out at its base to match the shape of the hull there.
These accoutrements add class to a guideboat. When we add to these the gunwale and decks we have a first class vessel.
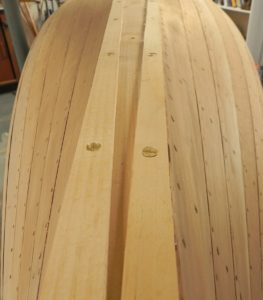
At last I have arrived at the final round of planking my guideboat. It seems that it has been a particularly difficult journey. With great relief I remove the batten that has been used to maintain the proper spacing between ribs. I can now fasten the last round of planking. Here we go!
Removing the batten that maintained proper rib spacing during construction.
With each planking round I have noticed that, at the stems, the upper edge of each plank has been slowly, but steadily, creeping upward. Viking ships were famous for this upward sweep of their hulls. According Durant the Vikings called this upward sweep snye. Here is an example of snye. It is on a model of a Vikings ship that I built many years ago.
Example of hull upsweep, or snye, on a model of a viking ship.
As I wrote earlier, snye on a guideboat helps it to navigate the rough waters that can spring up on Adirondack lakes, especially those with northeast/southwest orientation. Even in summer or early fall cold fronts can bring gale force winds that howl down those lakes and throw up some monster waves.
Here is what snye looks like on a guideboat.
Upward shift of planks, or snye, on a guideboat.
This snye, or upward shift of the upper edge of successive planks, requires that we now must use three planks on each side for round eight. How come? Well, if you wanted to use just two planks for each side, each plank would have to be extraordinarily wide. Here is one plank of the three needed for one side of round eight. It is for the hood end or one of the two planks that butt up to the stem. Now we have to use two scarfs on each side to join the planks together.
One of three planks required for each side of round eight.
Notice that it has sort of a “hook” at the upper end. We will plane the feather edge into one edge. The good news is that since this is the final plank we need apply the feather edge to one side only.
Applying the feather edge to one side of plank number eight.
I am using my Lie Nielsen low angle block plane. I love it! This tool has been indispensable through each stage of building this boat. Made in the USA in Maine it is a gem. It stays sharp indefinitely and can be dialed in to take the thinnest shaving. It is the only tool that worked to shape the stems as you will see.
Now the tedious process of fitting the plank to the previous one. It is a back and forth process. Check the fit, make adjustments, for numerous iterations.
Once the fit seems OK, then I will cut the scarf into the plank. We start by using a chisel, or slick, to start the process.
Using a slick to rough cut the scarf.
Next comes the low angle block plane.
Using the low angle block plane to cut the scarf.
Finally a touch up with the sanding long board and we are ready to go.
Using sanding long board to touch up the scarf.
Even at round eight there is some curvature to the hull. So I will use flash molding to give enough curvature to the plank to make it conform. As you may remember flash molding uses a thermal heating blanket to “steam in place”. The plank is first sprayed with water, then wrapped in aluminum foil, and the thermal blanket laid on top. This “sandwich” is heated to 300 degrees F and then the lower edge clamped down. The plank retains its new shape once it cools down.
I have used shims placed between the plank and ribs to give a little extra curve to the plank to allow for spring-back.
Shims used to give an extra degree of curvature to the plank.
So, at last, we arrive at a fully planked Adirondack guideboat. As the video at the Adirondack Museum showing Willard Hanmer building a guideboat puts it, we are now about half done. Really! Yikes!
I expected the seventh round of planking to be easier than those before it. It was not to be. This time I almost gave up. The challenges seemed insurmountable.
I need to start by reviewing the wood I am using. I am using Spanish cedar. As I tell everyone who will listen, Spanish cedar isn’t Spanish nor is it cedar. It originates in Central America and is a relative of mahagony. It is light weight and is extremely attractive when finished.
The early guideboat builders used white pine when planking their boats. The reason for their choice of white pine was that it was plentiful in the Adirondacks. I have come to realize that the builders could also get a desirable cut from white pine logs called quarter sawn. With quarter sawn planks the grain runs parallel to the long edge of the plank. I believe that the early builders also recognized that quarter sawn stock had an advantage when planking a guideboat. It was more pliable when they needed it to conform to the curve of the hull. With the other cut, flat sawn, each growth ring is stacked one on top of another like a deck of cards. It is very stiff when it comes to trying to make it conform to the hull shape. See the diagrams of flat and quarter sawn planks below. They were taken from my book Tale of an Historic Guideboat and How to Build One.
Flat Sawn vs Quarter Sawn Planks.
Spanish cedar comes in wide planks that are mostly flat sawn. You really have no choice when you select it at the hardwood purveyor. One benefit of flat sawn is that it is a lovely cut of wood, much more attractive than quarter sawn.
Here is a photo of flat sawn Spanish cedar on my boat. I enhanced it using mineral spirits. The application of spar varnish will also bring out the lovely appearance of this wood.
Flat sawn Spanish cedar with the grain enhanced..
With the seventh round I was having trouble matching the feather edge of each new plank with the previous one. I couldn’t close the gap between the fresh plank and the previous one. After scratching my head I came to find out that there was a gap, as much as 1/4″ between the previously installed plank and some of its ribs. This will never do. But how to correct it? I couldn’t remove and redo the previous plank. ( I could but let’s not go there)
I took a long step back and thought about how to make it right. We talked earlier about the dance wood plays with moisture. As I mentioned in a previous blog, wood can be coaxed to bend in different shapes when “steamed” or held at an elevated temperature in an environment saturated with moisture (steam). You might also remember that I use a technique I call “flash molding” to bend my planks so they conform to the ribs. The flash molding process is as follows: The plank is sprayed with water on each side and wrapped in aluminum foil. A thermal heating blanket is placed on the outside and the “sandwich” is clamped in its place next to the previous plank. The thermal blanket is turned on and the temperature raised to 300 degrees F. Once it reaches that temperature, the bottom, free side, is clamped down.To eliminate spring back I put small shims under each plank before performing flash molding.
In the present case the plank was already fixed in place on its top side. So I sprayed the outside of the plank with water and applied the aluminum foil to the outside only. Before all this I put the shims between each rib and plank midway down the rib. Then I clamped the thermal blanket in place and heated it all up. Here is a view of that going on.
Flash molding to get a plank to conform to the ribs.
It worked!
The plank now conformed perfectly to each rib. Phew!
Some lessons I have learned about the cut of wood and how easily it can be made to conform to the shape you want it to assume. I have built a number of lightweight canoes called Aerolite canoes by their inventor, Platt Monfort, of Maine. The ribs are of ash and must be bent to the shape of the hull. They are are probably 1/8″ thick by 1/2″ wide. I found that they must be of flat sawn ash. To shape them I first soak them for about a week in water and then submerge them in a pan of water as hot as I can get it. This causes them to become as flexible as wet noodles. I clamp them in place and let them dry. They take the shape I want beautifully.
Here is one of the Aerolite canoes I built.
Ultra light canoe with flat sawn ash ribs.
I had a terrible time getting a cherry gunwale to conform to the hull of the guideboats I was building. I had to set up a crude steaming tent and winch the gunwale in place. Then someone told me to use quarter sawn, not flat sawn, cherry for the gunwales. Sure enough it made a terrific difference.
So wood is nothing more than a composite material. Each spring and summer there is a growth spurt as the tree grows outward. As fall approaches, growth slows and ends. Where it ends the ring of growth forms a harder shell. This leaves the inner, faster growing part of the growth ring as being more pliable then the harder, outer shell. So, this means that with quarter sawn planks it is easier to bend them across the shorter part of the plank. With flat sawn wood it is just the opposite. It bends more easily along the length of the plank.
Now I am on the final leg of my planking journey. Round eight is the last round! This means I must confront snye. Do you remember the word snye? We will talk about it next time.
My friend Richard had a big problem. His most treasured possession, his guideboat, leaked. And not just a small leak, but it leaked big time, like the proverbial sieve. It was very special to him because his boo bah (grandfather) Fred Burns built it. You have heard of Fred, a renowned Long Lake guideboat builder, in an earlier blog. I told Richard to bring it over and I would have a look at it. The first I knew it was parked on our screen porch in Long Lake. Here I pose with Richard (I am the tiny one).
My friend Richard and me.
I learned from Richard that the boat had been overwintered in a hot, dry spot. This is the curse of wooden boats, especially guideboats. The seams dry out, but worse yet, they become irreversibly dry. No manner of submerging the the boat in water can restore the hull to original water-tight state. You see, wood and water play an delicate dance. A growing tree consists of mostly water, perhaps 80-90%. Because of that its branches are quite supple and can easily bend to ward off heavy winds. To make wood useful, the lumber man drives off the excess moisture. This brings the moisture content down to around 15%. However if we drive off too much water from wood it loses its resiliency and becomes brittle.
Then comes the boat builder who would like to return the wood to it original high moisture content so he can bend it to the shape he desires (Musical instrument makers have the same desire). They employ steaming to drive the moisture back into the wood. Steaming raises not only the moisture content of wood but its temperature as well. As these two factors reach a critical point wood becomes quite pliable and can be bent into very elaborate shapes. These shapes remain permanent upon cooling.
As wood pick up moisture it expands and as it loses moisture it shrinks. As long as its moisture content is not allowed to fall too far this contraction/expansion cycle can continue indefinitely. But when the moisture content of wood is allowed to drop too low, soaking at room temperature does not allow enough water to enter the descicated wood to produce any appreciable swelling. So Richard’s guideboat had reached this state of no return where no amount of soaking resulted in enough water uptake by the hull to stop the leaks.
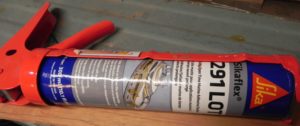
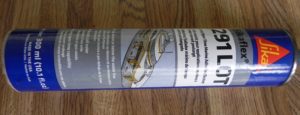
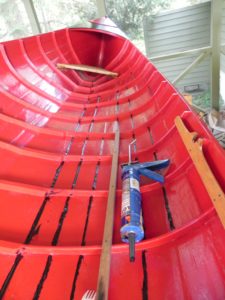
What to do? After some thought it came to me to use the same bedding compound I use in building my guideboats. It is called Sikaflex 291 LOT, The LOT stands for long opening time. Thus it takes 291 several hours to cure. That means it can be “pushed and shoved” into gaps to fill them without any time constraint on the “pusher and shover”. It comes in a tube that fits a caulking gun.
Sikaflex 291 LOT
Not having seen where the leaks were occurring I decided to attack the garboard plank and the bottom board first. I had noticed that there were some visible openings there as well. So I did my best to plug that area and gave Richard a call.
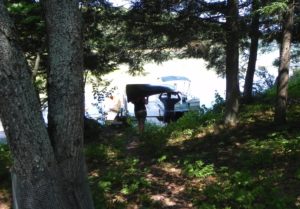
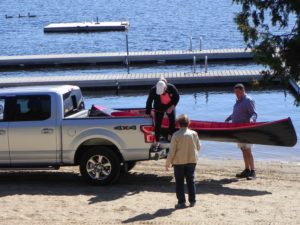
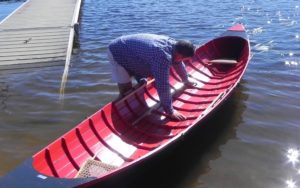
He brought his daughter and the two of them hauled the boat down to my dock for a water test.
Richard and daughter haul his guideboat down to my dock for a water test.
Down to the dock.
No dice! The boat still leaked mightily. So we agree to take the gloves off and go after every seam. This shows the job partly done with the 291 in some of the inboard seams.
Sikaflex 291 LOT has been applied in some of the inboard seams.
I grew tired of sealing the seams so Richard took over. He takes his boat to his shop at the Long Lake Camp for the Arts. He improves upon my caulking technique by using a high powered LED flashlight to shine along the hull. He applies the 291 wherever light shines through the seams.
Finally the day arrives when another water test is called for. The boat is shoved in the back of his pick up and off we go down to the lake shore.
Richard’s boat is moved to Long Lake for another water test.
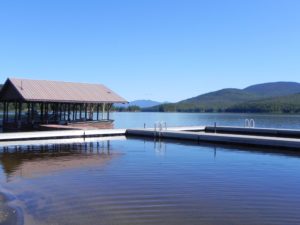
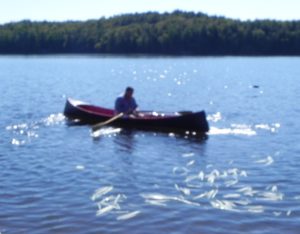
It happens to be a beautiful day in the Adirondacks.
A crystal clear early autumn day in the Adirondacks.
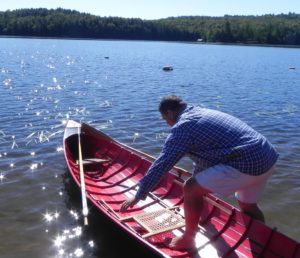
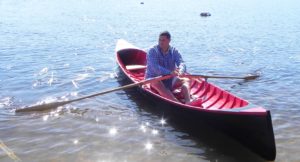
Richard is a bit cautious as he is reluctant to throw his whole self into the boat before he is sure it leaks no more.
Checking for leaks a second time.
It looks good but still not ready to jump in. Let’s check one move time.
Another check for leaks before jumping on board.
It still looks like a go. So off he goes.
Oarsman Richard pulls away for the dock.
The boats is sound and back to being Richard’s pride and joy.
Richard and his guideboat are reunited.
This is a day that Richard thought would never come true.