Before planking can begin there are many small tasks to complete.. These will ensure that, at this early stage, there will be no unpleasant surprises down the road.
We ended the last post with the nascent hull upside down on the strongback. Before going further, the ribs must be stabilized, or tied down. This is done using what the old timers called a spline. I use a spline made of a quarter inch square batten long enough to run the length of the hull. Since it will run along the shear line I mark that off first. I attach the spline to a stem and proceed down the line attaching each rib to it. Except for the ribs nearest the stems the ribs should be separated by the same distance as they are at the bottom board. Use a level to make the ribs nearest the stems plumb. The photo below shows the spline in place.
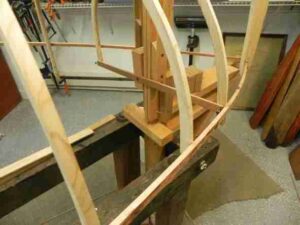
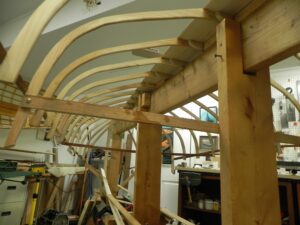
The photo also shows some of the cross-bracing that makes a rigid, secure hull. Below is another view of the bracing.
In this rendition of a guideboat there are eight rounds of planking, a garboard plank, six others and a shear plank. It really helps laying out the planks if you mark off where the lower edge of each plank falls at each rib station. This is done using a series of “tick tapes”. There is a tape for each rib station. The photo below shows a group of them.

The garboard plank is the easiest to install. That is because you only have to worry about lining up the forward edge of the plank. To do the lining off, clamp edge of the plank stock an inch or so above the first set of tick marks. Make sure the planking stock is wide enough to extend at least 2″ above the bottom board. Now take a compass and, for each rib station, transfer the first tick mark at each rib station to a point on the planking stock. This will give you a series tiny arcs, that when connected, provide the shape of the leading edge of the garboard plank. Use a batten to connect the arcs with a pencil line. Cut along the line and clamp the new plank onto the hull. If necessary, use a block plane to trim the edge to its proper shape.
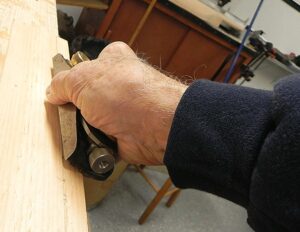
You will have an excess of plank above the bottom board. This excess has to be removed. The fastest way is to use a chisel. Be careful to go with the grain or you will have split running into the new plank. If you are reluctant to use a chisel use a block plane. This operation is best done after the plank has been installed.
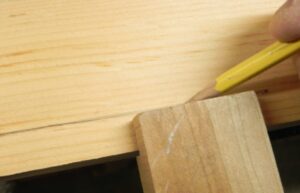
You will need to use two separate lengths of plank stock to span the length of the hull. These are joined together using a joint called a scarf. It is made by overlapping the two planks. Before we get to the scarf we need to apply a feather edge to the leading edge of each raw plank. If you are using 1/4″ thick planking the bevel will be 5/8″wide. I use a simple marking gage with a 5/8″ wide offset in it. I slide this along the plank while holding a pencil tight to the edge as shown below.
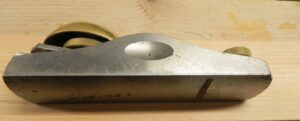
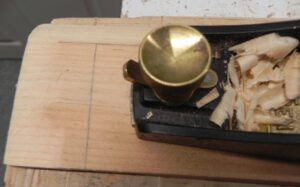
Now using a low angle block plane, I cut the lap. I use a Lie-Neilson low angle block plane. It is a pleasure to use. It is very simple to adjust the blade depth and it stays sharp seemingly forever. Here it is.
Cutting the lap is not easy and takes some practice. You will get plenty of practice while building this boat since there are over 200 yards of lap to be cut. The main difficulty in applying the lap is to keep it from becoming rounded. I hold the plane with my arm straight out in front of me. I “stiff arm” it. That seems to help prevent the plane from “rocking” sideways and causing it to round the bevel.
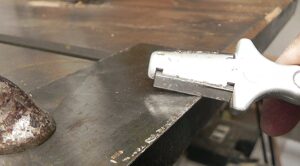
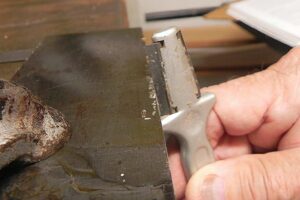
Then I finish the lap using a cabinet scraper. This simple tool is a godsend. It is simply a thin piece of carbon steel about the size of an index card. You apply a burr to the edges using a special sharpening tool. I use one made of tungsten carbide. It is shown below.

To sharpen the scraper, first grind or sand off the edges to be sharpened. Then clamp the scraper down flat on a stable surface. You can apply some bees wax or motor oil to it to help sharpen it. Now take the sharpening tool and run it several times across the flat surface.
This will produce a burr” along the edge of the scraper. Now you want to turn the burr 90 degrees so that it will act like a tiny plane.
It is not possible to use one plank to span the entire hull. You will need to connect two planks together using an overlap, or scarf joint. Before you can do the scarp joint you need to fit the “hood ends” of each of the two planks into the rabbets cut into the stems. The photo below shows a plank hood end fastened to the stems.
Applying the scarf is done once the lap is cut into the new planking and the hood end is fitted. For planking that is 1/4″ thick, I use a scarf that is one and quarter inch wide. Here it is lined off with the block plane ready to go.
The rules of a scarf is that it should fall on a rib. That means one of the scarfs on a plank should end in the middle of a rib. So the feather edge of one of the scarf joints should fall right on the center of a rib. The scarf on the mating plank must begin at the center of the rib and extend beyond it by one and a quarter inches. If you are not careful and don’t allow for this additional one and a quarter inches in laying out the plank you will have a plank hanging in free space.
To cut the scarf use a plane or chisel to remove most of the waste. Follow up with the long board sander.
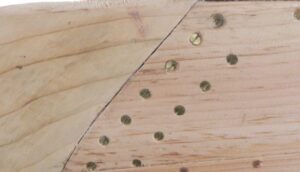
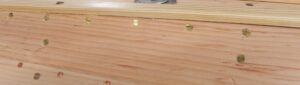
So now the garboard plank is ready for installation. Before attaching the plank, lay a bead of Sikaflex 291 Lot bedding compound on all surfaces that will be covered by the new planking. Now attach the planking using #4 X 5/8 brass screws located on each rib 7/8″ down from the edge of the bottom board. Apply additional screws every 1 1/2″ just 3/16″below the bottom board. See the photo below.
Installation of the garboard plank is a warm up for the work ahead. The garboard has only one edge to be concerned about. From now on fitting a new plank to the previous one will cause much head scratching.