My friend Andy at the Adirondack Museum called the seats in a guideboat the “Furniture”. Indeed the furniture got more elaborate as the boat builder’s clientele got wealthier and more sophisticated. Rudely constructed plank seats were just what the guide needed. They were low maintenance and lightweight.
But to compete with others, the builders had to step it up a notch. They moved to caned seats which took hours to construct. Caned seats were not very durable, another drawback. But the customer’s wishes came first so caned seats became the “in thing”.
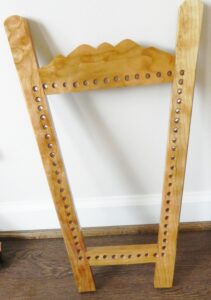
I might have told you that a guideboat is nothing but curves and it has no right angles. I need to amend that. The middle seat is rectangular which means that it is easier to make than the other seats and the seat back.
The seats are held together with mortise and tenon joinery. Years ago I bought a jig that fits my Delta table saw. Here it is:
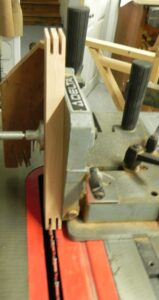

Top view of tenon jig.
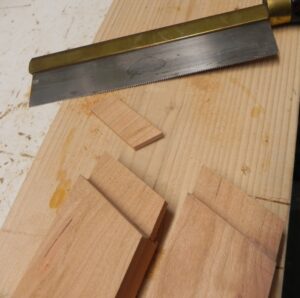
It helps with cutting the tenons. It holds the rail in position while you slide it over the saw to form the “raw” tenon. Once you cut the raw tenons you free them by cutting the excess away with a dove tail saw. Here is the result.
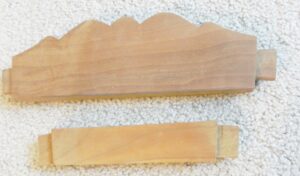
The intent of all this is to form the seat frame. It consists of the upright, or vertical, stiles and the horizontal members called rails. Except for the middle seat the bow, stern, and stern seat back frames are angled to fit the curvature of the hull. This greatly complicates their construction. The tenons need to be cut so as to fit into the mortise on the stiles. So the tenons must be cut at right angles to the stiles. This isn’t such a big deal but getting everything to fit tightly is a nightmare. It requires patience and some dumb luck.
To cut the mortises in the stiles I constructed a gig to use with my router. The stile is held in a box. One side of the box has a movable, spring-loaded side so that the stile can be held in position while being moved back and forth to mill the mortise. The tricky part is to position the router milling cutter directly on the center of the stile.
Once done the fun begins. The pieces are fitted together and misfits are obvious. After some backing and forthing the joinery meets my critical eye. I glue the assembly with Gorilla glue.
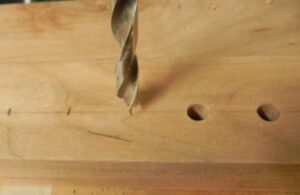
The next step is to drill the holes for caning. This is made easier if you have a drill press. Here is a view of the process.
the seat back is now ready for caning,
Next time caning the seats. I have been given high praise for caning my seats but is really a paint-by- numbers chore.